

First tutorial (ever) so please bear with me if it gets a bit loopy!
*BTW, I Highly reccomend the Oliso iron. It turned out to be 1000 times better than my Rowenta, and if you are the kind of person, who has scorched a thing or two, with this iron, that will never (ever) happen again. And no, I do not sell these or anything of the sort, it is just an awesome iron.

Patchwork ironing board cover materials list:
Ironing board cover pattern (The one I used is from 1967, but it is for a standard size ironing board, so any pattern should be OK)
Lightweight fusible interfacing
1 ¾ yards cotton fabric for base (optional, but highly recommended)
4 yards single fold bias tape
1 7/8 yards of ¼” wide elastic
348 assorted fabric squares measuring 2 ¼” wide x 2 ½” tall
*Note: I used a mixture of cottons, canvas and linens
All sewing done was with ¼” seams.

Color palette used:
Red
Yellow
Pink
Green
Multi-color
Orange
Blue
Brown/tan
Purple
Black
White
I recommend you organize the squares by colors in little stacks!

Start by cutting out your ironing board cover base. It works as a placement guide, and not to mention to give your cover some heft. I go thru those cheap mass produced covers a lot, and I finally have a sturdy cover that will last a long time.

To make the patchwork cover, there are a total of 30 rows of fabric squares.
Row 1-26 : 12 squares
Row 27-28 : 11 squares
Row 29: 8 squares
Row 30: 6 squares

Start with your first row of 12, choose your color and fabric placements, and don’t forget that you are using ¼” seam to sew all the squares!

Once you have sewn all 30 of your strips, press open your seams.

Having pressed open your seams, you can start piecing together the cover. Star with row 1 and 2, using ¼” seam and continue on until you reach the smallest strip (row 30)

Once all rows are sewn, and you have to go back and press open your seams. Yes, that is a lot of ironing, but if you want to have a lumpy cover, just skip it.
After you have pressed open the rest of the seams, add the fusible interfacing to the wrong side of the patchwork cover. Not only is it going to make it sturdy, but it will prevent your seams from unraveling later.
Now, lay your patchwork cover down (back side up) and place the cotton cover on top. Pin in place, and baste together.

Remove pins, and cut out cover shape.

See how none of your seams became un raveled, that is why I used the interfacing!

Your almost done!
Now, look at your handy work, and smile....

Or in my case, shoo the puppy away, there are a few more things to be done.

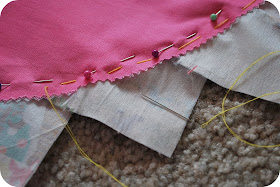
Pin (if you like) bias tape and machine stitch in place (right sides together) and don’t forget (like I did) to clip your corners!

Attaching elastic: Leave about ½” out, and secure in place at the top of your cover with a few machine stitches. Fold over (under side of cover) bias tape, and stitch in place as you stretch and feed the elastic thru. Secure end of elastic with a few machine stitches. Remove your baste stitches.

Final step: Most ironing board covers come with a very thin (and flimsy) layer of foam. I happened to have some ¼” thick foam, that I placed on the ironing board. I purchased the foam at JoAnn’s, if you want to add a foam base to it. Or, you leave the old cover one, to add some cushion to it. Slip the cover on your ironing board and Voila, your done.

I had a lot of fun making this cover, and writing the instructions down along the way. This tutorial is for your personal use only. Feel free to make one for yourself, or a friend, but not for sale in any way (Etsy, Artfire, Ebay, blah, blah blah).If you have any questions or if I missed a step (sorry) feel free to contact me. If you make one, send me a link to your picture, I would love to see it!
Simbiosis_etsy@yahoo.com
Red
Yellow
Pink
Green
Multi-color
Orange
Blue
Brown/tan
Purple
Black
White
I recommend you organize the squares by colors in little stacks!

Start by cutting out your ironing board cover base. It works as a placement guide, and not to mention to give your cover some heft. I go thru those cheap mass produced covers a lot, and I finally have a sturdy cover that will last a long time.

To make the patchwork cover, there are a total of 30 rows of fabric squares.
Row 1-26 : 12 squares
Row 27-28 : 11 squares
Row 29: 8 squares
Row 30: 6 squares

Start with your first row of 12, choose your color and fabric placements, and don’t forget that you are using ¼” seam to sew all the squares!

Once you have sewn all 30 of your strips, press open your seams.

Having pressed open your seams, you can start piecing together the cover. Star with row 1 and 2, using ¼” seam and continue on until you reach the smallest strip (row 30)

Once all rows are sewn, and you have to go back and press open your seams. Yes, that is a lot of ironing, but if you want to have a lumpy cover, just skip it.
After you have pressed open the rest of the seams, add the fusible interfacing to the wrong side of the patchwork cover. Not only is it going to make it sturdy, but it will prevent your seams from unraveling later.

Now, lay your patchwork cover down (back side up) and place the cotton cover on top. Pin in place, and baste together.

Remove pins, and cut out cover shape.

See how none of your seams became un raveled, that is why I used the interfacing!

Your almost done!
Now, look at your handy work, and smile....

Or in my case, shoo the puppy away, there are a few more things to be done.

Pin (if you like) bias tape and machine stitch in place (right sides together) and don’t forget (like I did) to clip your corners!

Attaching elastic: Leave about ½” out, and secure in place at the top of your cover with a few machine stitches. Fold over (under side of cover) bias tape, and stitch in place as you stretch and feed the elastic thru. Secure end of elastic with a few machine stitches. Remove your baste stitches.

Final step: Most ironing board covers come with a very thin (and flimsy) layer of foam. I happened to have some ¼” thick foam, that I placed on the ironing board. I purchased the foam at JoAnn’s, if you want to add a foam base to it. Or, you leave the old cover one, to add some cushion to it. Slip the cover on your ironing board and Voila, your done.

I had a lot of fun making this cover, and writing the instructions down along the way. This tutorial is for your personal use only. Feel free to make one for yourself, or a friend, but not for sale in any way (Etsy, Artfire, Ebay, blah, blah blah).If you have any questions or if I missed a step (sorry) feel free to contact me. If you make one, send me a link to your picture, I would love to see it!
Simbiosis_etsy@yahoo.com
wow, great job. It looks gorgeous.
ReplyDeletethat was soo cool !!i love all the little kawaii fabric square makes me wish i was crafty and owned a sewing machine BIG SIGH:O(
ReplyDeletei think the tutorial is very easy to understand. great job! and love the cover so much! if i only had the time and patience! huggs!
ReplyDeleteI can't believe how weird this is - just stumbled across your blog and was so happy to see your feedback about the Oliso iron - I was really thinking about buying one (I've always had a drippy Rowenta of some sort...) but didn't know of anyone who had actually used one. If you have any more input about it, I'd love to hear it. Now ... I'm off to check out the rest of your blog... -amy
ReplyDeleteyay - thanks for the tutorial!
ReplyDeleteOoooh, I covet your beautiful iron! I have a scary $5 iron from long's drugs :)
Is it bumpy to iron on?
ReplyDeleteThis is a work of art! Thank you for the tutorial.
ReplyDeleteThat is so attractive. I think I may inlist my girls in helping cut all of the squares. What a fun project.
ReplyDeleteI think this would make such a great and unique gift for a hard working mom, or as a housewarming present. I love giving and receiving handmade presents. :)
ReplyDeleteIt would certainly make ironing less of a chore!
i just linked here from whip up. this is super cute, thank you for the tutorial. your blog is lovely! i am adding you to my reader!
ReplyDeletenicola
http://whichname.blogspot.com
me parece muy bonita y ademas practica bravo!
ReplyDeleteAlexandra: If you iron open your seams, you will feel a texture, but it should not be bumpy.
ReplyDeleteI have had no problems with my own ironing, and sewing for a living, it says alot.
:D
Kelly: I would be scared using a $5.00 iron! Remember the story I wrote about how one of my cheap irons cought on fire?
ReplyDeleteWow, that is beautiful and wicked creative!
ReplyDeleteone word. wow.
ReplyDeleteThat is beautiful! I love your recommendation of that iron too, as I've been thinking about getting a new one.
ReplyDeletelove love love this.
ReplyDeleteso cute!
ReplyDeleteLove this. I'm going to have to have a go at one of those, I'm in need of a new cover and need to one day make something just for me.
ReplyDeleteThanks for sharing
I LOVE this! Do you sell them?
ReplyDeleteLovely tutorial. What a wonderful collection of fabric. You should be proud. A real stunner!
ReplyDeleteThis is sooooo adorable!! Thanks for sharing! I can't wait to whip one up!!
ReplyDeleteLove it - so pretty! I'm bookmarking to keep in mind for using up all my little scraps. Thank you! Great tutorial. :)
ReplyDeleteWhat a great idea, and a wonderful use of scraps.
ReplyDeleteA tip to make this an even easier project is to use Quilt Fuse--a gridded interfacing used to make watercolor quilts. I have no affiliation and have used this product with great results:
ReplyDeletehttp://www.whims.cc/quiltfuse.htm
And is the puppy a Chinese crested?
ReplyDeleteWhat a great idea. I love that you used the elastic as I've been wondering if I can do that to replace mine...I hate those stinkin' strings!
ReplyDeleteThank you so much for the tip Grace! I was thinking of making another one for my table top ironing board, and will totally keep that fuse in mind.
ReplyDeleteSusie, Ziggy is a long hair chihuahua.
:)
Hi there,
ReplyDeleteI just came upon your tutorial. I love your idea and think I'll make one. I do have a question though...because of all the seams with this pattern, is the cover kind of bumpy? such as, when you're ironing a piece of fabric, do the seams in the cover leave any sort of "line" or "grid pattern" in the fabric that's being ironed? just wondering. Thanks!
Donna
This looks fantastic, you must be very happy when you are ironing, all these happy colors. Great job, hug from Moia
ReplyDeleteJust stumbled upon you by doing a search for organizing fabric. :) This is just precious!
ReplyDeleteThanks so much for this tutorial, i made my own for a small ironing board using your tutorial and posted about it here
ReplyDeletehttp://qspace.id.au/blog/?p=327
Thanks for your wonderful tutorial - I've posted the photos on my blog.
ReplyDeleteWOW!!! It is looking perfect, great work, I will also try this at home!
ReplyDeleteWow thats so beautiful and cute.So nice of you ...:)
ReplyDeletepakistani talk shows
Coisa mais lindaaa!
ReplyDeleteBrilliant tutorials..!!!
ReplyDeleteNice job..!!Oak Bunk Beds