My books are among one of my most prized possessions. I love to read, just about anything from the silly and childish to the tear jerking and latest craze. So I have (finally--I know, I know) put together this super-duper easy Book Cover tutorial, that any level sewer seamstress can do, for any size book, hey you can even hand stitch it!
Materials:
-Outer fabric (I used canvas)
-Inner fabric (I used cotton)
-Lightweight fusible interfacing
-Brown or butcher paper
-Pencil
-Ruler
-Trim's (lace, buttons, rickrack) optional
-1/4" seams where used thruout.
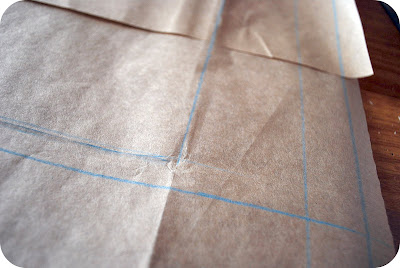
Cut out (or piece together) a piece of paper larger than your book, height and width wise.
Wrap paper around your book, crease and mark the edges with a pencil.
Now, you are going to add your seam and inner flap allowances.I added 1/2" to the top and bottom, and 2 1/2" to each side (for inner flap). Use your ruler to make your pattern nice and straight! Now using your pattern, cut one out of your outer fabric, as well as one of your inner (lining) fabric. And since we do not want a floppy book cover, take your fusible interfacing, and press it onto the backside of each of your fabrics.
And now, the fun part! Here is where you can go either really creative, or just stay a plain Jane. This owl and mushroom print is one of my all time favorites, so I only added a bit of rickrack. However, the possibilities are pretty much endless. You can use a plain linen as your outer fabric, and use all sorts of different sized buttons, vintage lace, embroidered flowers, among other things to decorate your book cover. If you are a Sudoku/crossword fanatic, and are making a cover for one of those books, you can make a small slip pocket, to hold your pen or pencil on the outside!
So I attached my bright cherry red rickrack in place. Pretty, pretty.
And now, with right sides together, stitch around the cover, but be sure and leave a opening wide enough for your to turn the cover inside out (but you knew that already!). I used 1/4" seams!!!!
Having the cover turned right side out, take some scissors (slightly blunt) and, gently push from the inside of cover, make sure your corners are nice and squared. I know that they sell corner thingies at fabric shops, but I personally have managed to somehow cut thru fabric using those things, so I refuse point blank to use them. I always use scissors (these right here, as a matter of fact) and have never ripped a seam, or cut thru fabric.
(almost done!)
Now,once your cover is nice and squared, press along the edges, paying special attention to the part you left opened, that it is folded nice and even with the rest of the cover. Now take your book, center it on the cover, and press in place your inner flaps.
Having everything pressed in place, stitch around the cover, staying as close to the edge as possible.
Your all done!!!
Doesn't your book look nice and cozy now?What is really great about this book cover, it pretty much is a basic pattern making lesson, where using all the steps, you can make a slip cover for any size book, photo album, or checkbook as well. Feel free to use (non-commercial) and link to this tutorial, and if you make one, please send me some pictures, I would love to see them: simbiosis_etsy@yahoo.com
And...
While I have made and sold some book covers in my Simbiosis shop in the past, I am currently working on a few more, that will also include a super cute, and matching book mark for you! So stay tuned.
I hope you liked this tutorial, and that it made sense more than anything, lol. If you have any questions, feel free to contact me, and I will be more than willing to help you out as much as I can. I hope you have a lovely weekend, Mele and I are actually going down to California for the weekend *doing a silly jig of happiness* so I will be back with more Julie-ness next week.


10 comments:
I adore the one you made! I love owls! :D
What a cute book cover! Thanks for the tute. Too bad I don't read anything good enough to warrant a cover (or naughty enough to need one, heh). Oh, maybe a sketchbook cover...
Have fun in cali! Watch out for the CHP - they're everywhere...
Super cute! Thanks for the tutorial. What a great project. I think my girls might be able to do this one.
Love, love, love that material!! Super cute and great tutorial! Thanks for sharing this!!
I've always wondered how this is done. I haven't ever attempted something like this. Thanks! You did a lovely job with cute fabric and darling results.
I loved the tutorial and the owl fabric! Thanks for posting. I am going to share this tutorial on my Twitter account.
Oh my goodness... what a great tutorial!! The fabric is too cute. :) I just found your blog, and I love it! I'll have to browse around on here later. ;)
~ Love & Blessings,
Lindsay <3
Lovely! Linked to you!
http://allawesomelinks.blogspot.com/2011/06/sew-fabric-book-cover.html
Thanks for the great tutorial!
great tutorial. you never can have enough of them...for yourself or as a gift.
I linked to your tutorial on my blog - thanks for sharing!
doro K.
Love this s o easy
Post a Comment